Date:2025-08-07
How to Replace Your Car Battery (2017 Audi Q7 Example)
This guide provides detailed steps on safely replacing the battery in your vehicle, with a specific focus on the 2017 Audi Q7.
Removing the Old Battery
Before you begin, gather these tools and safety gear:
- Tools: 10 mm and 13 mm wrenches, socket set, screwdriver, plastic pry bar, multimeter, work light or flashlight, wire brush or old toothbrush, rust-inhibitor spray.
- Safety Gear: Acid-resistant gloves, safety glasses, long sleeves.
- Workspace: Park on level ground in a well-ventilated area. Engine off, parking brake engaged, doors and windows closed.

Locate & Inspect
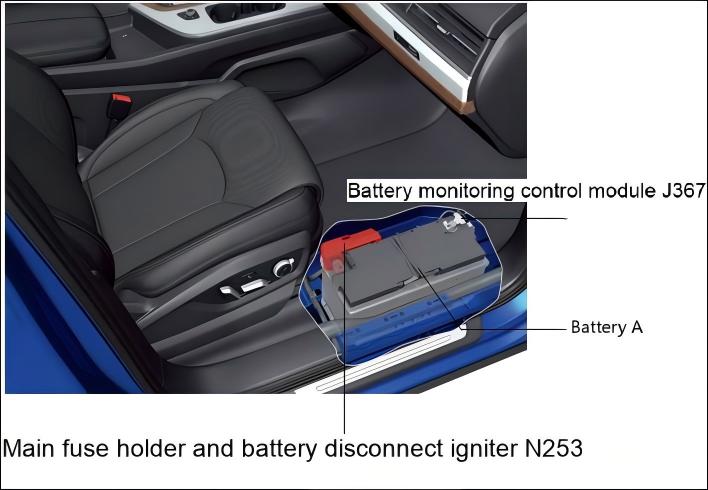
- On the 2017 Audi Q7, the battery sits under the floor panel in front of the right-side second-row seat. Slide the seat forward, remove the trim panel and protective cover.
- Shine your light in and verify battery group, terminal orientation, and look for cracks, bulges, or acid leaks.
Check Voltage & Optional Auxiliary Power
- Open the observation port on the cover and measure terminal voltage with a multimeter. If it’s above 12.6 V, you can skip auxiliary power; if lower, proceed.
- To preserve radio presets and memory, you may hook up an external battery. Always hook positive first, then negative—but land the negative clamp on a chassis ground point, not directly on the battery post, to avoid shorts.
Disconnect the Battery Cables
- Turn off the ignition and remove the key. (Some older cars require ON position; follow the manual.)
- Disconnect negative cable first: loosen the 10 mm nut, pull the clamp off, and tuck it aside on an insulated pad.
- Then disconnect positive cable the same way and cover it with an insulated cloth.
- If there’s a vent hose on the battery, detach it now—handle it gently.
Remove Battery Hold-Down & Extract
- Remove the hold-down bolts (usually 13 mm) and lift out the clamp bar.
- Wearing gloves, grasp the handle (or sides) and lift straight up—get help if it’s too heavy.
- Place the old battery on a spill-proof mat away from sparks or flames.
Clean the Battery Tray & Terminals
- Inspect the tray for corrosion. Mix baking soda with water (1:10), scrub acid residue with a wire brush, rinse, and dry.
- Spray a light coat of rust inhibitor on bare metal surfaces.
Installing the New Battery
Verify & Pre-Check
- Confirm the new battery matches Group 49 (H8): same dimensions, terminal locations, 850–950 CCA, and ~90–92 Ah capacity.
- If possible, test open-circuit voltage (≥ 12.6 V) and internal resistance with a battery analyzer at ambient temperature ≥ 5 °C to rule out “surface charge” issues.
Position & Secure
- Lower the battery into the tray so the anti-vibration mat seats properly. Align the hold-down bracket, reinstall bolts, and torque to spec (about 8–12 Nm).
- Reattach the vent hose, making sure it’s not kinked or pinched, and keep the battery tilt under 30°.
Reconnect Cables & Protect Terminals
- Connect positive cable first: slip the clamp on, tighten the 10 mm nut snugly (don’t overtighten).
- Then connect negative cable the same way.
- Spray or grease terminals with a corrosion inhibitor.
Remove Auxiliary Power & Initialize Systems
- Register the new battery’s group and serial number.
- Clear related Diagnostic Trouble Codes (DTCs).
- Run a “battery state of health” calibration if available.
- Remove any temporary jump-battery connections.
- Close all doors and verify no warning lights remain. For vehicles with a Battery Management System (BMS), use an OEM or compatible scan tool to:
Test Charging System
- Start the engine and measure voltage at the battery posts: 13.8–14.4 V at idle, then again at ~2000 RPM. If you have a scan tool, record live data.
Check Parasitic Draw
- With ignition off, doors closed, and alarm armed, clamp an ammeter around the negative cable. Parasitic current should be under 50 mA; if higher, pull fuses one at a time to locate the drain.
Troubleshooting Tips
- Engine cranks slowly or not at all: Verify cable tightness and cable gauge.
- Infotainment resets or glitches: Ensure battery was registered with the BMS.
- Warning lights persist: Re-scan and clear codes; confirm BMS sees the new battery.
Maintenance Tips
- Inspect the battery and terminals every six months.
- For extended storage (> 1 month), disconnect the negative cable or use a smart maintainer to prevent deep discharge.
- Annually update BMS software and run a battery health check to keep charging strategy current.
Following these detailed steps will help you safely and effectively replace the AGM battery in your 2017 Audi Q7 and ensure your electrical system operates at peak performance. Good luck!
Recommend
2025-11-26
Lithium Battery Electrolyte Crystallization vs Evaporation Guide
2025-11-19
LiPF6/EC Electrolyte Concentration and Temperature Shape Low-Temperature Lithium-Ion Battery Performance
2025-11-12
LiFePO₄ Cathode and Low-Temperature Performance | How LFP Structure Limits Lithium-Ion Battery Capacity
2025-11-12
What Is Electrolyte Formulation Engineering? | Balancing Trade-Offs and Functional Design in Lithium-Ion Batteries

